
Right from the start it is necessary to mention one important point in order that the use of knots in mountaineering may be correctly understood. The fixing of a knot to a rope reduces the strength of the rope almost in half. Tying knots therefore leads to the degradation of the features of the rope or webbing. For this reason it is necessary to tie knots to a rope judiciously, only in situations when it is critical and brings us some indisputable advantage. The reduction in the strength of the rope is caused by several factors. Above all, in a knot mechanical and thermal (friction) stress occurs as a result of forceful bending around small diameters, which leads to compressing the fibres of the strands of rope on the inside of the bend and stretching the fibres outside the bend. The application of both pulling and pushing tension occurs, caused by the lateral compression of adjacent strands of the rope in the knot. And last but not least, the mutual shifting of the individual structural elements of the rope also contributes to the reduction of strength, from the level of the fibres all the way to the molecular level.
There have been a series of experiments on the load-bearing properties of knots and their comparison, but unfortunately their authors always used different methodologies and therefore their results in certain findings differ, and there is not much point in examining them in great detail. On one point, however, they agree – the stronger variant of knot is the one where the load-bearing strand of the rope runs out the top of the knot, that is, as close as possible to the eye formed (in other words, for the strand of rope which we will load immediately after entering the knot to form a curve with the largest possible bend radius inside of it). Also, the more a rope is wound in turns inside a knot, the stronger the knot. For example, a simple angler’s knot with one loop can bear less than, for example, a triple angler’s knot, where there are three loops. Or a figure eight knot, where the rope is crossed over more times in the eye and bent in curves with larger radius, carries more than, for example, an overhand knot.
The load-bearing strength of a knot is further influenced by how the knot is loaded, whether normally or anomalously (for an explanation of these terms, see the Terminology section below). The list in the table indicates the different strengths of knots under various loads.
Knotting terminology
The various phases of a knot have their own respective names:
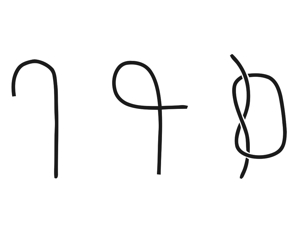
Other frequent concepts associated with the nomenclature surrounding knots are as follows:
Knot tied on the end – tying a knot at the end of a rope in such a manner that we lead one end of the rope forward, like a head, whose trajectory (path) is then followed by the other parts of the rope. After tying this knot only one usable strand of the rope is left, the second is only a short tail piece of rope.
Knot tied in the bight – tying the knot somewhere arbitrarily in the middle part of the rope. The apex of the bend in the rope now becomes the imaginary head, and two strands follow its trajectory. After tying this knot, two relatively long strands lead from the knot.
Hitches, loops – knots formed by an eye which can firmly enwrap an object when pulling on the rope leading out of the knot. These knots exist in cinching forms as hitch knots (e.g. the clove hitch) or in non-cinching forms as loop knots (figure eight on a bight, bowline,…).
Double-triple – … knot – multiple winding of loops around the strands of rope, or a knot forming multiple eyes (two-three-or more).
Standing part – the part of the rope that passes through the knot or emerges from the knot and continues on as the rope. Also called the “fixed end of the rope” or “usable end of the rope”.
Working part – the part of the rope emerging from the knot, and returning back into it. It actually forms the knot.
Tail of the rope – one of the strands of the rope emerging from the knot. It is also possible to encounter the term “loose end of the rope”. In a practical sense it only comes about through the process of knotting, and is actually that head that defined the trajectory of the rope during knotting. Here in the text this end of the rope will be somewhat informally, but aptly and sweetly, referred to as the tail end.
Anomalous loading – possible only with a knot tied in the bight of the rope, with two long strands of the rope leading out. Pulling force is applied along these two strands, i.e. the knot is “pulled apart”.
Peripheral loading –possible only with a knot tied on the end of the rope. Does not result in pulling on the strand or strands of the rope emerging from the knot. Pulling is applied only to two or more opposite points on the working end. At the same time knot itself is loaded more or less “anomalously” from inside the knot.
Knots can be divided into various groups according to various criteria. A somewhat simple and for mountaineering perhaps optimal classification is into anchoring knots, bends, prusik hitches and handling knots.
Anchoring knots are used for fastening rope. In mountaineering most often to points of protection (e.g. piton, nut, and others equipped with carabiner), or to a harness on the body of the climber when tying in to the rope.
Bends are most often used in mountaineering for joining two ropes together, and for joining the ends of a short piece of rope or webbing, called a sling.
Prusik hitches are used in mountaineering mostly for shinnying along a rope, for fixing (securing) a rope, either when self-belaying or rappelling, or during various rescue processes, such as pulling an incapacitated climber to a belay station, pulling one out of a glacial crack, lowering to an injured party, etc.
Handling knots are somewhat of a special group, serving mostly for handling the rope or influencing rope movement during various operations with it. We can include various stopper knots, shortening knots, so-called slip knots, etc. in this group.
Anchoring knots
Figure eight knot (a.k.a. Figure of Eight on the Bight, Middleman’s Knot, F. Noeud en huit) – use – for rope: YES; for webbing: YES
The basis for creating this knot is a figure eight formation. The options for use of this knot are varied:
1. Most often used for tying in to rope, it is considered the primary tying knot.
The knot does not show a tendency to slip, and upon strong tension it can be untied relatively easily (it is necessary to take this information with a grain of salt; if the knot is pulled after a heavy fall, for example, untying it will be understandably more difficult).
2. Of course it is possible to use a knot tied with a figure eight for anchoring any rope to a point of protection. For example, using a figure eight bend to anchor to the end of a fixed rope.
3. This knot can also be made on a short piece of rope for the purpose of creating a knot as a piece of protection. The knot can then be inserted to a rock crack which narrows such that the knot placed in it holds when pulled. An overhand knot is often used for this purpose (see text below), but it can happen that the volume of the eye is sometimes small in relation to the size of the rock crack, and therefore the figure eight knot can be used, which is somewhat larger than the overhand knot in terms of volume.
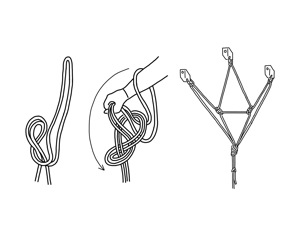
4. The knot can be relatively easily tied with one hand at the end of a rope hanging down to a person from above. This works well for tying two end pieces of rope or webbing which have been threaded through a rock tunnel. This way a climber can tie in to a rock tunnel with only one hand:
Don’t grip the knot with your hand right at the ends. The tail ends of the knot under the hand must be at least 30 cm long;
When first gripping the ends of the knot, always have the thumb of the hand on top (!) along with the other fingers;
Don’t let the knot tighten around the wrist too much, or you won’t be able to withdraw the palm of your hand.
The figure eight loop is ranked among the very safe knots, usually sport climbers use it to tie in to a seat harness. It is necessary to run the strands of rope neatly next to one another, and after completing the knot, to cinch it tight. This knot can be easily visually checked thanks to its regular shape, which means that it is appropriate for beginners. Of course, even despite its safety, it is recommended when tying rope to the harness to make a backup knot on the tail end.
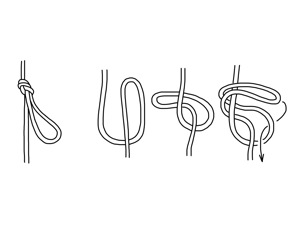
If you want to tie a figure eight in the bight, and we presume it will be anomalously loaded (i.e. both strands of the rope exiting the knot), it is better to tie a somewhat modified version of the figure eight knot, the so-called “in-line figure eight”. A figure eight knot tied in this manner has better load-bearing parameters under anomalous loading. Of course, the knot (eye) formed should be loaded only in one optimal direction – on the image indicated that would be downward. In the opposite, suboptimal direction of loading the knot slips and capsizes in various ways. So for situations when we can’t guarantee which end of the rope will be up and which will be down during anomalous loading, it is better not to use this knot and to rely instead on the butterfly knot (discussed further on in the text).
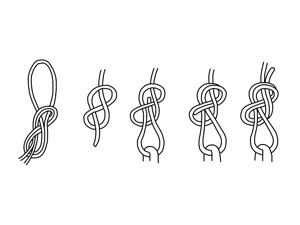
Double Figure eight (a.k.a. Rabbit Knot, F. Noeud huite double, Noeud en orelles de lapin) – use – for rope: YES; for webbing: POOR
With a double figure eight knot we create two knots on the rope, where one can be enlarged after pulling the strand of rope through to the detriment of the other. It’s practical use is in the option of creating a so-called “floating anchor”. This anchor ensures equal distribution of loading forces on all points of protection (in the picture these are three bolts, and thereby five carabiners are needed for this, most appropriate for this purpose would be oval or “O” carabiners with locking sleeves). Such a “floating anchor” is good for anchoring a fixed rope in rugged terrain, for example, where it is necessary to reduce the loading of each individual point of protection. It is necessary, however, to mention that the creation of a “floating anchor” takes up a significant part of the rope, so the length of the fixed rope would be shortened by a matching amount.
Continued in the book >>
| iPhone, iPad, Mac | |
| Android, web browser | |
| Kindle Fire |  |
| Kindle e-ink | |